And now we start from scratch to create a cool lava + rocks shader!
 Documentation→Manual→Beginner→Part 3 - Molten Fun!
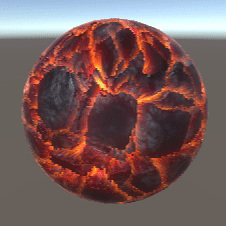
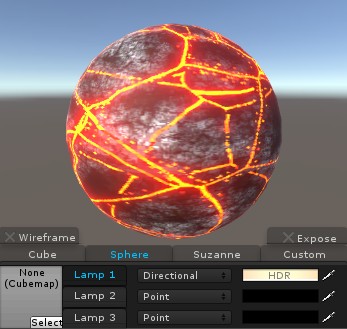
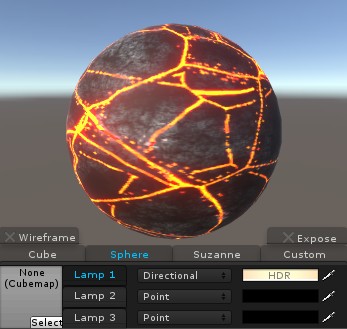
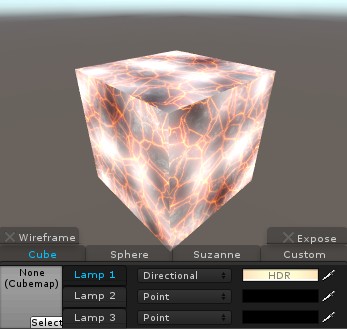
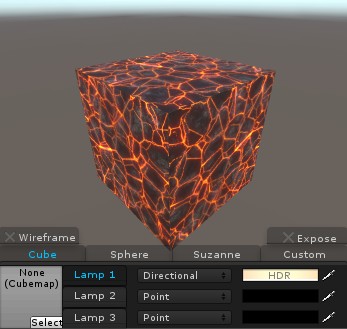
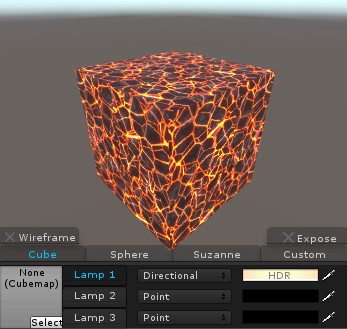
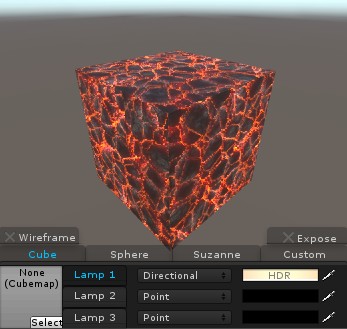
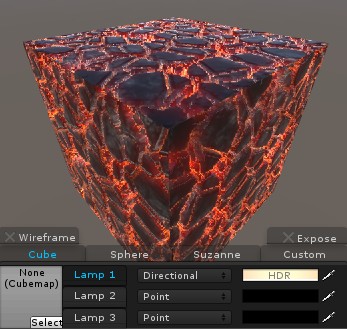
Hello again! Ready for something a lot more interesting?! All right, for the final beginner tutorial we'll be making a kick-ass molten rock shader thing, like so:
It's got depth, it's got movement, it's got it all! Well, let's get going! For this we'll have to make a new shader, so just click File->New.
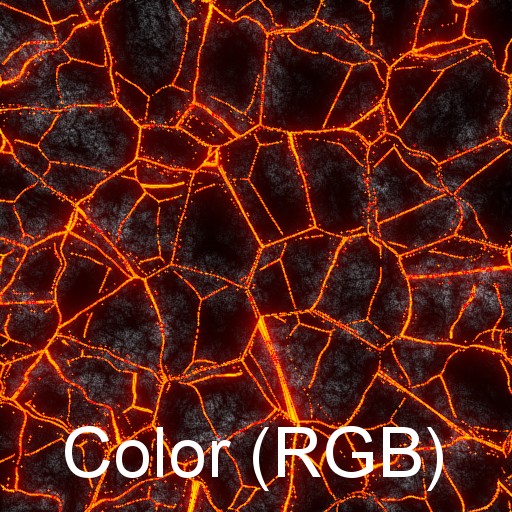
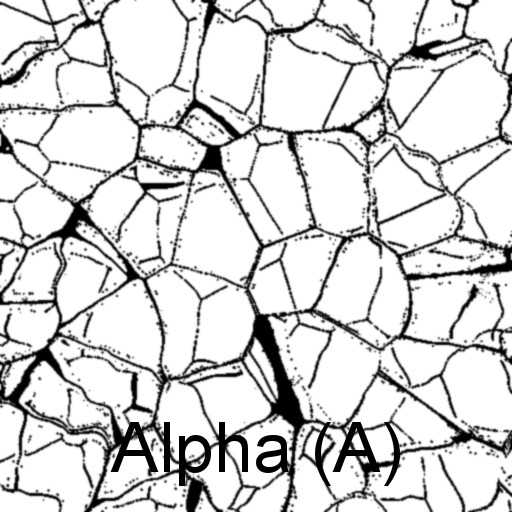
The first thing we'll add is a texture, so set the pre-existing layer's type to Texture. For this shader you should set it to the provided AshCracked.png texture. It has some cool looking ashy fire stuff; the alpha channel has complete transparency at the firey parts, and opaqueness at the ashy parts.
All right, it already looks kinda interesting - a good shader never makes up for neat art - but we can do more. We're going to make the lava parts really pop-out and glow, along with making them slightly animated.
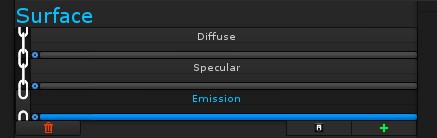 To start, let's add Emission just like we did last tutorial. Go into the Ingredients panel, add the emission ingredient, then head on back to the layers panel.
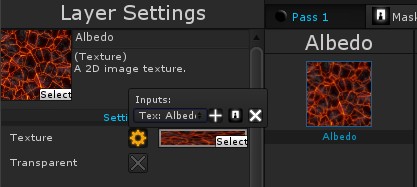
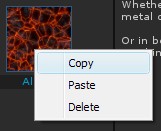 We're going to copy the texture layer from the Diffuse channel into the
Emission channel. Right-click on the texture layer and copy it. Then right-click in the Emission channel and paste it.
We're going to copy the texture layer from the Diffuse channel into the
Emission channel. Right-click on the texture layer and copy it. Then right-click in the Emission channel and paste it.
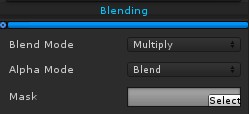
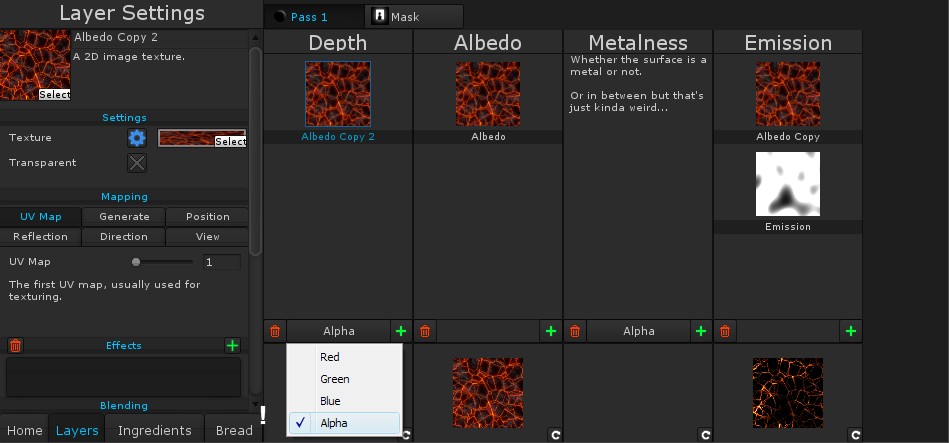
Already the shader is glowing, however it's not quite what we want. We want only the lava parts to glow, and to do this we need to have only the lava parts get mixed into the emission. Since we have an alpha channel that isolates the lava, we need to make it use the alpha. Right in the layer settings is an option for that: Transparent.
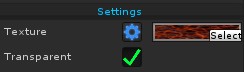
After checking it, you'll notice it does the exact opposite of what we want, making only the ash parts show, and the lava parts dimmer – ideally we'd fix this in the texture itself, but this is a tutorial XD. We need to invert the alpha, on to the effects panel!
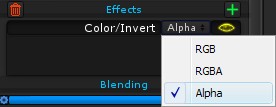 To invert the alpha, we are going to add the Invert effect! Click the + button next to the effects area and add the effect from Color/Invert. At first the effect will invert the colors, so now just set it to only affect the Alpha (instead of RGB).
Hooray, now only the lava is glowing! Next we're going to animate it slightly, however first let's go ahead and save.
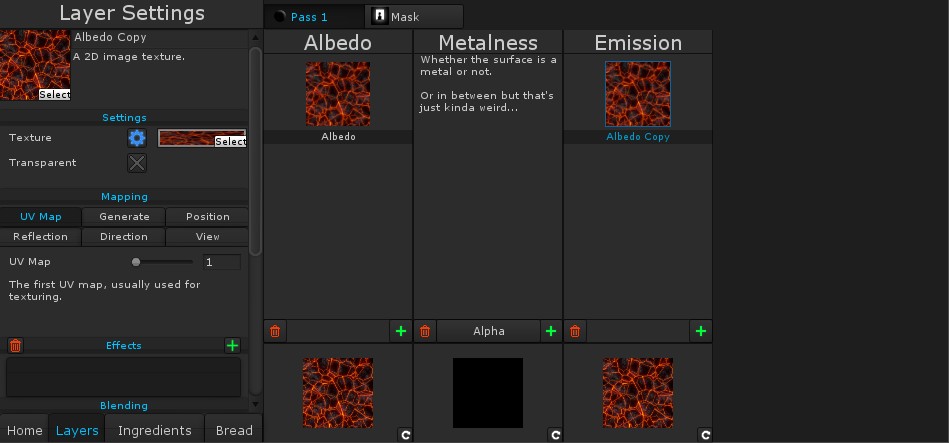
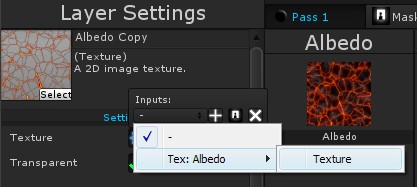
 Ah, you'll see that there are two texture inputs! In this case we want to use the same texture for both of them (and we'll be making a few more copies later so we definitely don't want them stacking up). Let's add an input for the albedo texture.
Then link the emission texture to it by clicking the drop-down and selecting the Albedo texture's input.
Alright, now to make the lava look like it flows slightly, with parts dimming and glowing over time. Lets add another layer in the Emissions channel, and set it to the Perlin Noise type (new and shiny!).
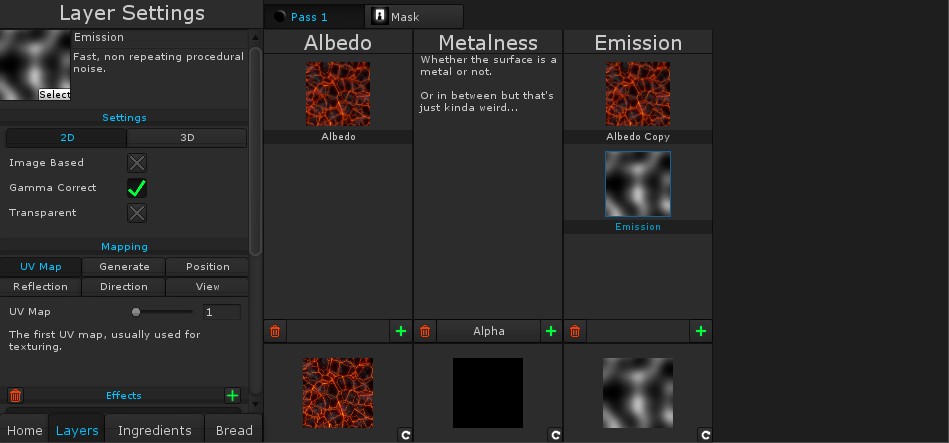
 The idea is to have this noise multiply onto the emission (So it darkens different parts), and then animate it. First let's set the blend mode to multiply, like we did in part 1.
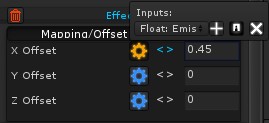 Now to animate it. We're going to add the effect Mapping/Offset. As you drag the X offset you'll see the noise scroll. Next, add an input for the X offset.
So, how are we going to make it animate automatically? For this we get to go into a new panel, the Bread panel (why did I go through with that name...). At the bottom of the layer settings on the left there'll be a button called "Bread". Click it, and the new screen will appear!
This is the Bread panel – which contains settings that affect the entire shader such as it's name or supported rendering path – but more importantly is where all the inputs we've made over the tutorials vanish off to. On the right we can see how the inputs will show up in the material panel. Here you can change their name, default values and a bunch of other stuff including animation (you can access most of the input's settings by double clicking on them).
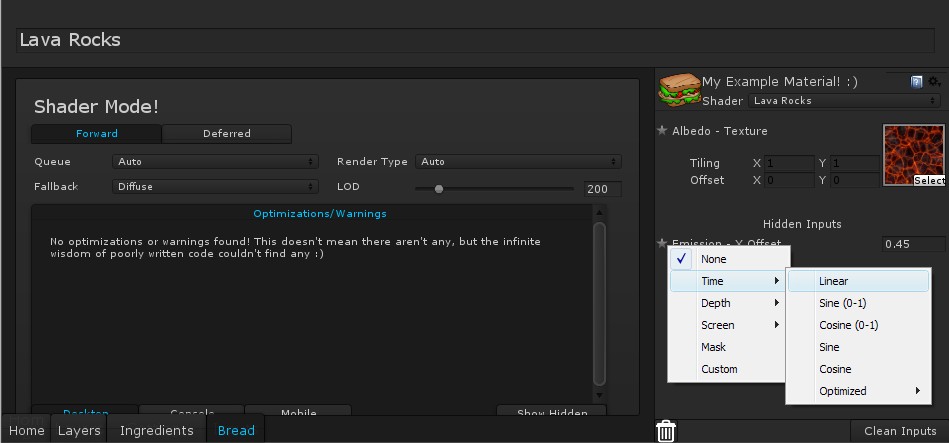
Since we can't animate an input that'll show in the material panel, let's drag it down into the Hidden Inputs section. Now if we click on the star beside it's name we can set its replacement to Time/Linear. Double clicking on the input will let you adjust the speed.
Going back to the Layers panel will show the animation in the mini previews at the bottom of the channels. If it gets distracting you can turn it off through the Previews/Mini Previews/Animate menu item.
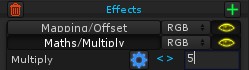 One last thing we might want to change about the emission is to brighten it up a bit. Add the Maths/Multiply effect to the noise layer, and set it to 3 or something. This'll make the glow brighter.
Ok, well so far we have this:
But it's missing the depth that proper lava cracks would have. The amount of detail in the cracks that we'll add would be difficult to model, and use a massive number of polygons. Instead of modeling the cracks, we're going to integrate them directly into the shader using a technique called Parallax Occlusion Mapping.
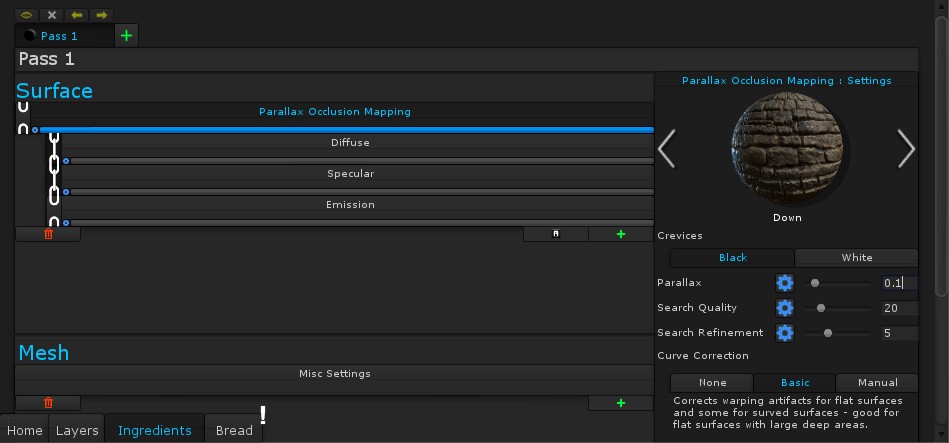
First, let's add the Depth/Parallax Occlusion Mapping (POM) ingredient, and drag it to the top (so it affects the diffuse, specular and emission).
 (In case you've noticed, the Bread now has an exclamation mark, we'll get to that in a sec :P)
There are a few different settings here. The Parallax defines how deep the cracks can go (I find around 0.1 or so works here, although I'll add an input), and as you increase it you'll see the texture look further away – this is it simulating the change of depth. The quality defines the quality of the POM, the higher the better. I've kept mine at the default. Of course currently it won't look particularly good, since we haven't told it how the height changes over the surface.
Head on back to the Layers panel and you'll see yet another channel, the Depth channel. This is where we can add layers to define the depth, with white as the normal surface level, and black as the deep parts (This can be changed with the POM Crevices setting). At the bottom of the channel you'll notice an option for Red, Green, Blue or Alpha. Since the height is a single value and isn't a color, you can choose which color channel (Red, green, blue or alpha) to use.
 So, since the alpha channel for the texture layer has the cracks as 0 (Black), and the ash at 1 (White), we can just copy and paste the layer into the Height channel, and tell it to use the alpha. As before, right click on the texture layer (From the Albedo channel), and choose copy. Then right click in the Height channel and paste it. Then, at the bottom of the Height channel choose the Alpha (Out of the RGBA options) and it'll work!
All right, so what now? It looks cool, but can we make it look even more cool? Yup! We're going to add a bit of shine, and a normal map to really make the depth pop. Although not entirely accurate, as long as it looks good, who cares!
First off, let's go into the ingredients panel again. Let's select the automatically created Specular ingredient, and turn up the smoothness – let's also add an input to it for convenience. I didn't know this the first few times I wrote this tutorial, but as it turns out obsidian - the cooled lava - actually is rather shiny...I just thought it looked good XD. However the shinyness should be turned down for the lava parts, I'll leave that as an exercise for the reader ;)
Now to add a normal map to really accentuate the bumps. A normal map looks like this:
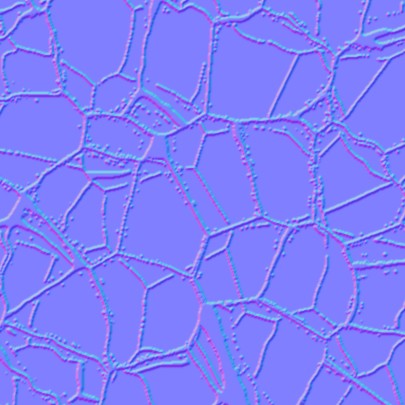
When lighting an object, the shader uses the normal of the surface (the direction it's pointing in) in conjunction with the direction to the light. The normal map can bend the normals of the surface per-pixel to add fake bumps and crevices.
Currently, even with the POM, the normals are of a flat object which causes the lighting to look flat too – this'll fix that. So go ahead and add a Tangent Normals ingredient (Normals/Tangent Normals), drag it up to just under the POM ingredient (so it's still affected by it) and go back to the layers panel. There's now a Normal map layer channel ready for us.
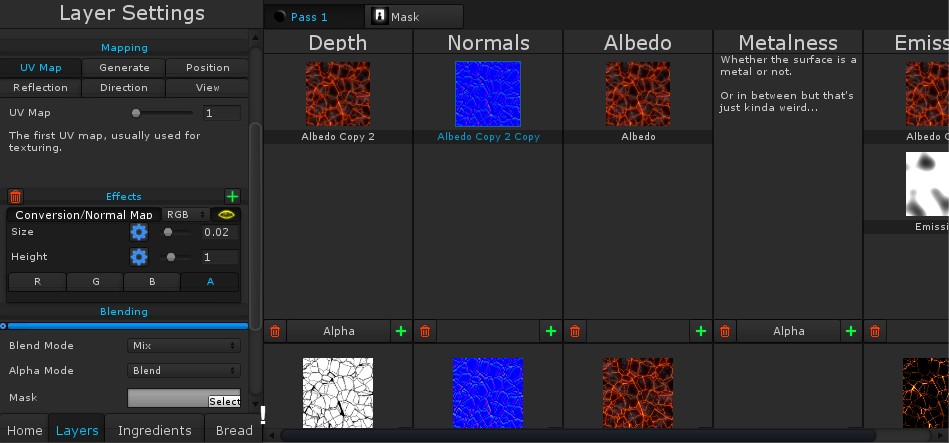 So, let's add a normal map! In most cases a normal map is made as a separate texture, but we are going to generate ours in the shader. Copy and paste the texture layer from the Albedo channel into the Normal channel. This'll make the preview look pretty strange, because we haven't added a normal map. However, there's an effect that can convert it to a normal map.
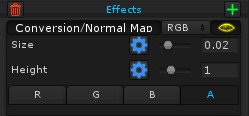 Add the Conversion/Height to Normals effect and play around with the settings. The size is the distance between samples of the texture (The smaller the less artefacts), and the height defines the strength of the normal map. The RGBA at the bottom is what channel the effect samples from, since it treats the texture like a height map. In this case you'll want the channel to be the alpha (A), since that is also what we use for the POM height map.
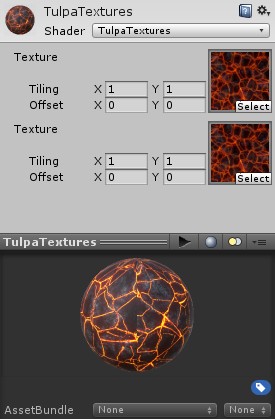
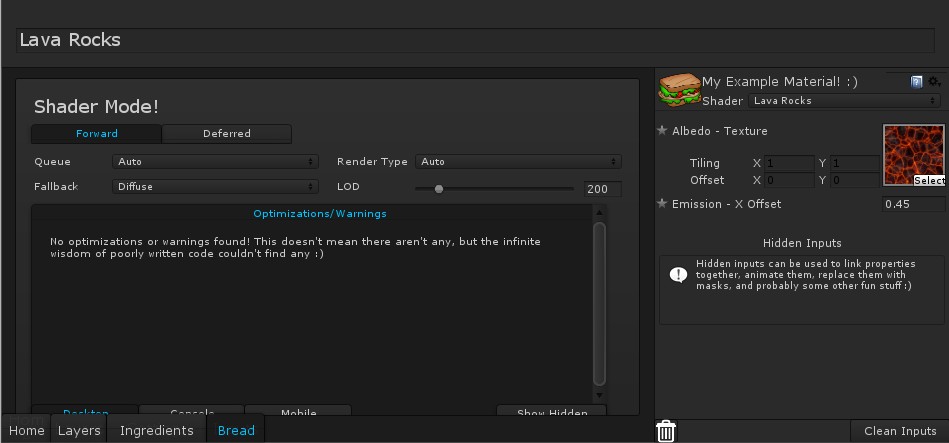
Alright, finally we're going to make the shader a bit nicer to work with in the material inspector - while it's great the shader works well with this specific texture, in the future we'll likely want to be able to adjust the settings to suit whatever other ways we use it.
So let's go back into the Bread panel and take a look at the Inputs area - it's designed to be a WYSIWYG (What you see is what you get) editor for the material inspector, and I can see a few things I think would make the shader easier to work with; of course feel free to make any changes you want :).

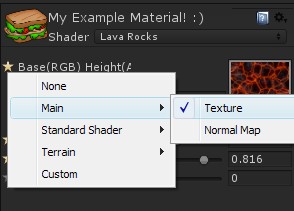
First off, let's rename the texture; we can double click on the input to edit its names and settings, I'm going to call it "Base(RGB) Height(A)". We can also tell Unity what the texture represents, by selecting Main/Texture once we click on the star beside it - this will help Unity keep the texture even if we switch back to the Standard shader or whatever.
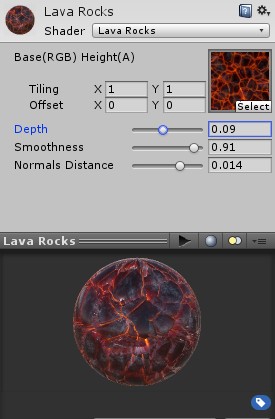
Next I'm gonna rename Parallax to Depth, and by double clicking I'll change the range to 0-0.2 (for easier adjustment). Once again we can tell Unity it represents the Standard Shader/Parallax setting; we can also do the same for the Smoothness, setting it to Standard Shader/Glossiness.
Finally I'll go back and add an input for the Height to Normals effect's Size setting, since the current one might not work for other textures - I'll also rename it to Normals Distance, and set its range to 0-0.02.
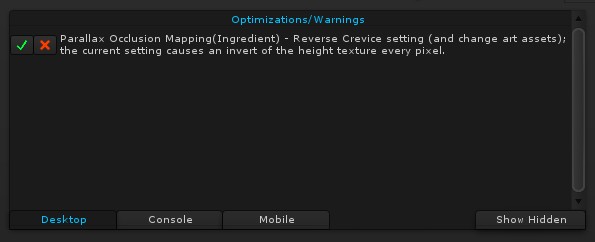
Now while we're here, you'll notice that there's an area to the left called “Optimizations/Warnings”. This is what the exclamation mark on Bread has been telling us about. Shader Sandwich will automatically find optimizations and possible issues, and you can either hide them, or use their solutions.
In this case I'm going to hide it (click the X) since it's a tutorial, but generally it'd indeed be better to invert the alpha channel of the texture, rather than do it multiple times in the shader.
 Good job! You've now finished the beginner tutorials and are well on your way to becoming a Shader Ninja! or, something....
Well, you're on your own now, have fun!
It's got depth, it's got movement, it's got it all! Well, let's get going! For this we'll have to make a new shader, so just click File->New.
The first thing we'll add is a texture, so set the pre-existing layer's type to Texture. For this shader you should set it to the provided AshCracked.png texture. It has some cool looking ashy fire stuff; the alpha channel has complete transparency at the firey parts, and opaqueness at the ashy parts.
All right, it already looks kinda interesting - a good shader never makes up for neat art - but we can do more. We're going to make the lava parts really pop-out and glow, along with making them slightly animated.
To start, let's add Emission just like we did last tutorial. Go into the Ingredients panel, add the emission ingredient, then head on back to the layers panel.We're going to copy the texture layer from the Diffuse channel into the
Emission channel. Right-click on the texture layer and copy it. Then right-click in the Emission channel and paste it.
Already the shader is glowing, however it's not quite what we want. We want only the lava parts to glow, and to do this we need to have only the lava parts get mixed into the emission. Since we have an alpha channel that isolates the lava, we need to make it use the alpha. Right in the layer settings is an option for that: Transparent.
After checking it, you'll notice it does the exact opposite of what we want, making only the ash parts show, and the lava parts dimmer – ideally we'd fix this in the texture itself, but this is a tutorial XD. We need to invert the alpha, on to the effects panel!
To invert the alpha, we are going to add the Invert effect! Click the + button next to the effects area and add the effect from Color/Invert. At first the effect will invert the colors, so now just set it to only affect the Alpha (instead of RGB).
Hooray, now only the lava is glowing! Next we're going to animate it slightly, however first let's go ahead and save.
Ah, you'll see that there are two texture inputs! In this case we want to use the same texture for both of them (and we'll be making a few more copies later so we definitely don't want them stacking up). Let's add an input for the albedo texture.Then link the emission texture to it by clicking the drop-down and selecting the Albedo texture's input.
Alright, now to make the lava look like it flows slightly, with parts dimming and glowing over time. Lets add another layer in the Emissions channel, and set it to the Perlin Noise type (new and shiny!).
The idea is to have this noise multiply onto the emission (So it darkens different parts), and then animate it. First let's set the blend mode to multiply, like we did in part 1.
Now to animate it. We're going to add the effect Mapping/Offset. As you drag the X offset you'll see the noise scroll. Next, add an input for the X offset.So, how are we going to make it animate automatically? For this we get to go into a new panel, the Bread panel (why did I go through with that name...). At the bottom of the layer settings on the left there'll be a button called "Bread". Click it, and the new screen will appear!
This is the Bread panel – which contains settings that affect the entire shader such as it's name or supported rendering path – but more importantly is where all the inputs we've made over the tutorials vanish off to. On the right we can see how the inputs will show up in the material panel. Here you can change their name, default values and a bunch of other stuff including animation (you can access most of the input's settings by double clicking on them).
Since we can't animate an input that'll show in the material panel, let's drag it down into the Hidden Inputs section. Now if we click on the star beside it's name we can set its replacement to Time/Linear. Double clicking on the input will let you adjust the speed.
Going back to the Layers panel will show the animation in the mini previews at the bottom of the channels. If it gets distracting you can turn it off through the Previews/Mini Previews/Animate menu item.
One last thing we might want to change about the emission is to brighten it up a bit. Add the Maths/Multiply effect to the noise layer, and set it to 3 or something. This'll make the glow brighter.
Ok, well so far we have this:
But it's missing the depth that proper lava cracks would have. The amount of detail in the cracks that we'll add would be difficult to model, and use a massive number of polygons. Instead of modeling the cracks, we're going to integrate them directly into the shader using a technique called Parallax Occlusion Mapping.
First, let's add the Depth/Parallax Occlusion Mapping (POM) ingredient, and drag it to the top (so it affects the diffuse, specular and emission).
There are a few different settings here. The Parallax defines how deep the cracks can go (I find around 0.1 or so works here, although I'll add an input), and as you increase it you'll see the texture look further away – this is it simulating the change of depth. The quality defines the quality of the POM, the higher the better. I've kept mine at the default. Of course currently it won't look particularly good, since we haven't told it how the height changes over the surface.
Head on back to the Layers panel and you'll see yet another channel, the Depth channel. This is where we can add layers to define the depth, with white as the normal surface level, and black as the deep parts (This can be changed with the POM Crevices setting). At the bottom of the channel you'll notice an option for Red, Green, Blue or Alpha. Since the height is a single value and isn't a color, you can choose which color channel (Red, green, blue or alpha) to use.
So, since the alpha channel for the texture layer has the cracks as 0 (Black), and the ash at 1 (White), we can just copy and paste the layer into the Height channel, and tell it to use the alpha. As before, right click on the texture layer (From the Albedo channel), and choose copy. Then right click in the Height channel and paste it. Then, at the bottom of the Height channel choose the Alpha (Out of the RGBA options) and it'll work!All right, so what now? It looks cool, but can we make it look even more cool? Yup! We're going to add a bit of shine, and a normal map to really make the depth pop. Although not entirely accurate, as long as it looks good, who cares!
First off, let's go into the ingredients panel again. Let's select the automatically created Specular ingredient, and turn up the smoothness – let's also add an input to it for convenience. I didn't know this the first few times I wrote this tutorial, but as it turns out obsidian - the cooled lava - actually is rather shiny...I just thought it looked good XD. However the shinyness should be turned down for the lava parts, I'll leave that as an exercise for the reader ;)
Now to add a normal map to really accentuate the bumps. A normal map looks like this:
When lighting an object, the shader uses the normal of the surface (the direction it's pointing in) in conjunction with the direction to the light. The normal map can bend the normals of the surface per-pixel to add fake bumps and crevices.
Currently, even with the POM, the normals are of a flat object which causes the lighting to look flat too – this'll fix that. So go ahead and add a Tangent Normals ingredient (Normals/Tangent Normals), drag it up to just under the POM ingredient (so it's still affected by it) and go back to the layers panel. There's now a Normal map layer channel ready for us.
Add the Conversion/Height to Normals effect and play around with the settings. The size is the distance between samples of the texture (The smaller the less artefacts), and the height defines the strength of the normal map. The RGBA at the bottom is what channel the effect samples from, since it treats the texture like a height map. In this case you'll want the channel to be the alpha (A), since that is also what we use for the POM height map.
And yay it looks pretty cool!
Alright, finally we're going to make the shader a bit nicer to work with in the material inspector - while it's great the shader works well with this specific texture, in the future we'll likely want to be able to adjust the settings to suit whatever other ways we use it.
So let's go back into the Bread panel and take a look at the Inputs area - it's designed to be a WYSIWYG (What you see is what you get) editor for the material inspector, and I can see a few things I think would make the shader easier to work with; of course feel free to make any changes you want :).
First off, let's rename the texture; we can double click on the input to edit its names and settings, I'm going to call it "Base(RGB) Height(A)". We can also tell Unity what the texture represents, by selecting Main/Texture once we click on the star beside it - this will help Unity keep the texture even if we switch back to the Standard shader or whatever.
Next I'm gonna rename Parallax to Depth, and by double clicking I'll change the range to 0-0.2 (for easier adjustment). Once again we can tell Unity it represents the Standard Shader/Parallax setting; we can also do the same for the Smoothness, setting it to Standard Shader/Glossiness.
Finally I'll go back and add an input for the Height to Normals effect's Size setting, since the current one might not work for other textures - I'll also rename it to Normals Distance, and set its range to 0-0.02.
Now while we're here, you'll notice that there's an area to the left called “Optimizations/Warnings”. This is what the exclamation mark on Bread has been telling us about. Shader Sandwich will automatically find optimizations and possible issues, and you can either hide them, or use their solutions.
In this case I'm going to hide it (click the X) since it's a tutorial, but generally it'd indeed be better to invert the alpha channel of the texture, rather than do it multiple times in the shader.
Good job! You've now finished the beginner tutorials and are well on your way to becoming a Shader Ninja! or, something....Well, you're on your own now, have fun!