Continuing on from the last part, let's make it look cooler by adding a rim light!
 Documentation→Manual→Beginner→Part 2 - Avant Garde!
In the last tutorial we created a diffuse shader similar Unity's standard one, which was fun and all, but nothing particularly useful. Well, lets add something new to it. Lets add, a rim light!
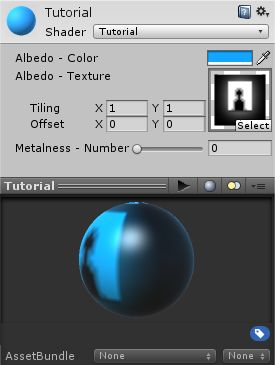
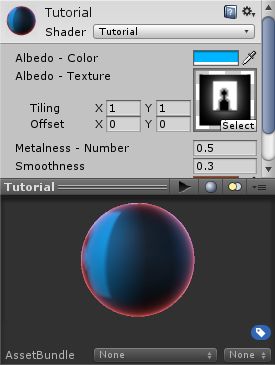
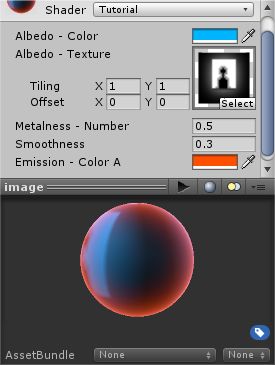
This is what the final shader will look like, compared to the previous one:
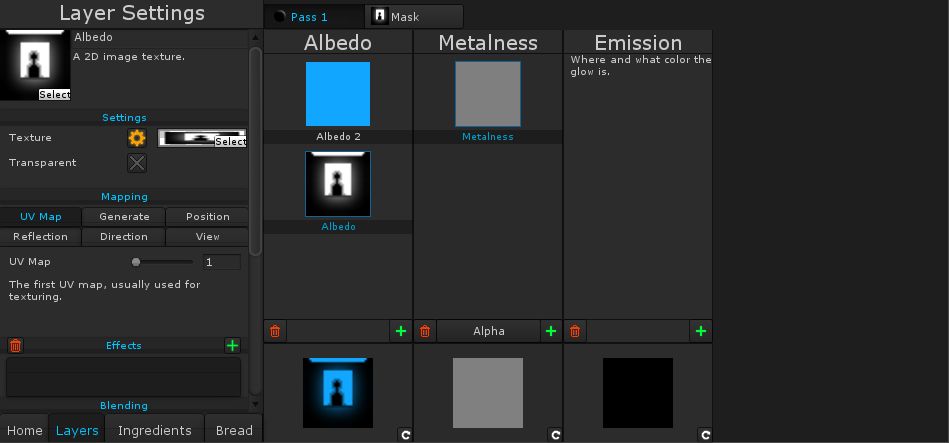
Well, lets go! The obvious thing to do might be to add a layer to the Albedo channel (The different columns are called "channels"); however, this isn't a good idea. Rim lights tend to glow, instead of being lit by lights (like the Albedo channel). No, we need a channel that isn't there, one that glows!
It's time to go to another glorious panel, where we can alter all kinds of settings for the shader. Click on the "Ingredients" button at the bottom left corner of the screen, and a bunch of new stuff will show up.
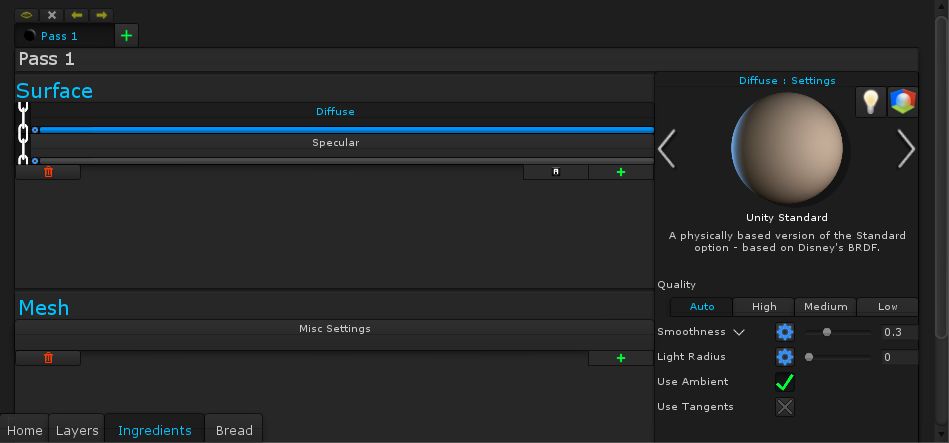
This is the ingredients panel. It's a pretty powerful area that can be used to add ingredients – these ingredients might be ones that affect the Surface, like diffuse and specular lighting, or ones that affect the Mesh, like displacement and subdivision. Each of these ingredients contain layer channels that help control them, which are what you see in the Layers panel. For example, the diffuse ingredient has the albedo channel, and the specular has the metalness channel
You'll notice that on the right side are a bunch of settings for the currently selected ingredient - and one of those is Smoothness! So let's go ahead and add an input there, so we have full control over the material.
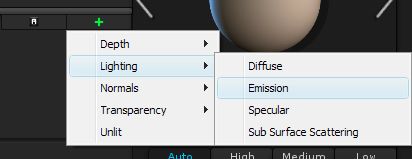 As for our glows, let's add an emission ingredient! Just click the plus button under Surface to add it.
It'd probably be a good idea to save now. I saved mine as a new file called "Rim Light".
Alright, lets see what this affects. Click on the button that says "Layers" at the bottom-right and the Layers panel will come back. We now have a new channel, the Emission channel!
Ok, now it's time to start adding our rim light layer. Add a new layer to the Emission channel, and set its type to gradient.
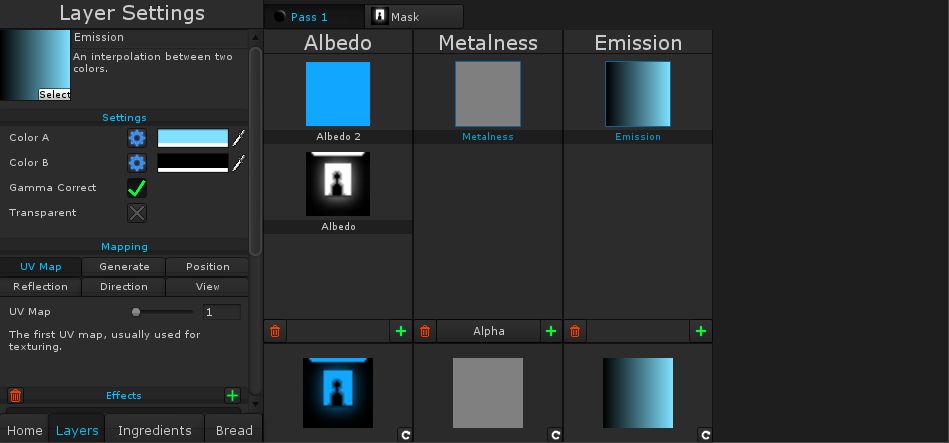
The idea here is that we'll get the Color A to appear on the edge of the object, while Color B appears at the center. I've set Color B to black, so the only part that'll glow will be the Color A. However, at the moment the gradient is "mapped" to the UV Map, which isn't what we want at all.
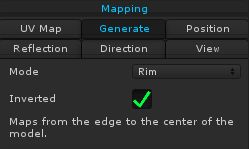 Down the bottom of the layer settings on the left will be an area with a bunch of options like "UV Map, Generate, Position" and a few others. This is the mapping area. The mapping defines how Shader Sandwich knows where to put different parts of the layer. For example, should the gradient be stretched from top to bottom, should it be projected from the camera, or should parts of it be mapped to the edge, and parts mapped to the center? In our case we want that last option, so we're going to set the gradient's mapping type to Generate, and set the mode to Rim!
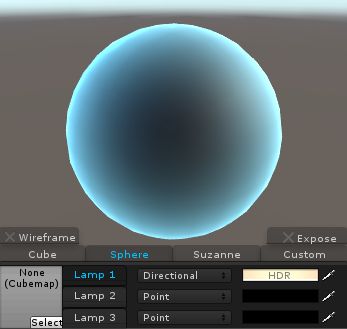 Well, we're getting close to being done now! The rim light is looking pretty nice (It has a better effect on round objects), but we have a similar problem to the last tutorial;
the rim light's color can't be changed in the editor.
Well, we're getting close to being done now! The rim light is looking pretty nice (It has a better effect on round objects), but we have a similar problem to the last tutorial;
the rim light's color can't be changed in the editor.
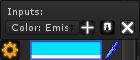
Well, lets give it an input then! Click on the gear next to the Start Color setting, and like before click the + button on the mini popup that appears. Save now and the rim light's color can be changed!
 That's good and all, but we're missing one last thing: the
ability to change the thickness of the rim light. There are a
couple of ways to do this in Shader Sandwich, but I'll cover
the simplest.
That's good and all, but we're missing one last thing: the
ability to change the thickness of the rim light. There are a
couple of ways to do this in Shader Sandwich, but I'll cover
the simplest.
 With the rim light layer selected scroll to the bottom of the layer settings on the left. You'll see an area called Effects:
This is a very handy area that allows you to alter layers in many ways, such as blurring them, pixelating them, altering hues, setting them to grayscale and much more. In this case, we're going to use a maths effect called power - which has one setting, the power - that allows you to raise all the color components to a power. It functions similarly to a gamma setting you might find in an image editor.
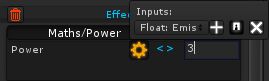 Your effects panel will be clear, so lets add something to it!
Click on the Plus button in the effects panel, and choose the effect "Maths/Power".
When you increase and decrease the power you'll see the rim light get smaller and larger. Once again, we should add an input here so the thickness is adjustable in the editor
Horray, the rim light shader is done! Looks pretty cool huh? This stuff is still pretty simple though, so I'd suggest hopping over to the next tutorial!
This is what the final shader will look like, compared to the previous one:
Well, lets go! The obvious thing to do might be to add a layer to the Albedo channel (The different columns are called "channels"); however, this isn't a good idea. Rim lights tend to glow, instead of being lit by lights (like the Albedo channel). No, we need a channel that isn't there, one that glows!
It's time to go to another glorious panel, where we can alter all kinds of settings for the shader. Click on the "Ingredients" button at the bottom left corner of the screen, and a bunch of new stuff will show up.
This is the ingredients panel. It's a pretty powerful area that can be used to add ingredients – these ingredients might be ones that affect the Surface, like diffuse and specular lighting, or ones that affect the Mesh, like displacement and subdivision. Each of these ingredients contain layer channels that help control them, which are what you see in the Layers panel. For example, the diffuse ingredient has the albedo channel, and the specular has the metalness channel
You'll notice that on the right side are a bunch of settings for the currently selected ingredient - and one of those is Smoothness! So let's go ahead and add an input there, so we have full control over the material.
As for our glows, let's add an emission ingredient! Just click the plus button under Surface to add it.It'd probably be a good idea to save now. I saved mine as a new file called "Rim Light".
Alright, lets see what this affects. Click on the button that says "Layers" at the bottom-right and the Layers panel will come back. We now have a new channel, the Emission channel!
Ok, now it's time to start adding our rim light layer. Add a new layer to the Emission channel, and set its type to gradient.
The idea here is that we'll get the Color A to appear on the edge of the object, while Color B appears at the center. I've set Color B to black, so the only part that'll glow will be the Color A. However, at the moment the gradient is "mapped" to the UV Map, which isn't what we want at all.
Down the bottom of the layer settings on the left will be an area with a bunch of options like "UV Map, Generate, Position" and a few others. This is the mapping area. The mapping defines how Shader Sandwich knows where to put different parts of the layer. For example, should the gradient be stretched from top to bottom, should it be projected from the camera, or should parts of it be mapped to the edge, and parts mapped to the center? In our case we want that last option, so we're going to set the gradient's mapping type to Generate, and set the mode to Rim!
Well, we're getting close to being done now! The rim light is looking pretty nice (It has a better effect on round objects), but we have a similar problem to the last tutorial;
the rim light's color can't be changed in the editor.Well, lets give it an input then! Click on the gear next to the Start Color setting, and like before click the + button on the mini popup that appears. Save now and the rim light's color can be changed!
That's good and all, but we're missing one last thing: the
ability to change the thickness of the rim light. There are a
couple of ways to do this in Shader Sandwich, but I'll cover
the simplest.
With the rim light layer selected scroll to the bottom of the layer settings on the left. You'll see an area called Effects:This is a very handy area that allows you to alter layers in many ways, such as blurring them, pixelating them, altering hues, setting them to grayscale and much more. In this case, we're going to use a maths effect called power - which has one setting, the power - that allows you to raise all the color components to a power. It functions similarly to a gamma setting you might find in an image editor.
Your effects panel will be clear, so lets add something to it!Click on the Plus button in the effects panel, and choose the effect "Maths/Power".
When you increase and decrease the power you'll see the rim light get smaller and larger. Once again, we should add an input here so the thickness is adjustable in the editor
Horray, the rim light shader is done! Looks pretty cool huh? This stuff is still pretty simple though, so I'd suggest hopping over to the next tutorial!
Login!